
How a Web Browser Works: From URL to Web Page
Opening a website feels almost effortless. You type an address into your browser, press Enter, and within seconds a complete page appears on your screen.
Behind that simple action, however, many technologies are working together.
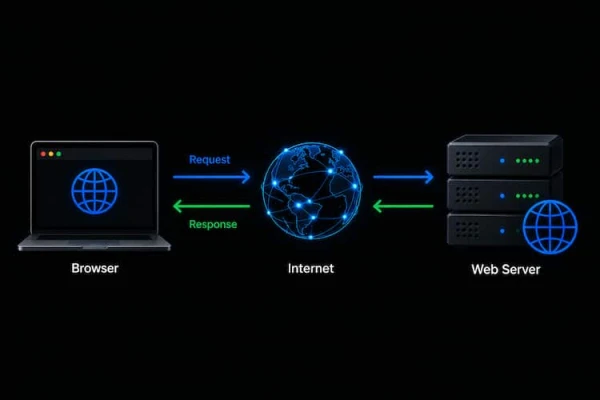
The browser must understand the URL, discover where the website is hosted, communicate across the internet, establish a secure connection, send an HTTP request, wait for the server to process it, receive a response, and finally transform HTML, CSS, and JavaScript into the page you see.
Understanding how a browser works gives developers a clearer picture of what happens between the frontend, network, and backend. It also makes problems such as DNS failures, HTTP errors, slow pages, broken routes, and server errors much easier to understand.
This article follows that complete journey—from entering a URL to seeing the finished web page.
What Is a Web Browser?
A web browser is an application designed to retrieve, interpret, and display resources from the web.
Chrome, Firefox, Edge, and Safari are familiar examples, but displaying a web page is only the final part of what a browser actually does.
Before a page appears, the browser may need to:
- Interpret the URL entered by the user.
- Find the destination using DNS.
- Establish network communication with the server.
- Exchange HTTP or HTTPS messages.
- Process the server's response.
- Download additional resources such as CSS, JavaScript, images, and fonts.
- Render the final page on the screen.
In other words, the browser sits between two worlds:
- The user — who enters URLs, clicks links, submits forms, and interacts with the page.
- The web infrastructure — including DNS servers, routers, web servers, backend applications, databases, and APIs.
Understanding this relationship provides the foundation for the rest of the browser request lifecycle.
Step 1: Everything Begins With a URL
Imagine entering:
https://example.com/products
After typing the URL and pressing Enter:
- The browser first analyzes the address.
- It identifies the information contained in the URL.
- The URL tells the browser what resource the user wants and how communication should begin.
Understanding the URL
In our example:
https://example.com/products
The URL contains several important parts:
- https — identifies the scheme or protocol used to access the resource.
- example.com — identifies the domain name.
- /products — identifies the path to a specific resource on the website.
URLs can also contain additional information, including subdomains, port numbers, query parameters, and fragments.
For example:
https://shop.example.com/products?id=25
In this URL:
- shop — is the subdomain.
- example.com — is the domain name.
- /products — is the path.
- ?id=25 — is a query string containing a parameter.
The browser recognizes that it needs to communicate with the website identified by the domain name. However, network communication ultimately depends on IP addresses.
The browser therefore needs to discover the addressing information associated with the domain.
This is where DNS becomes important.
Step 2: The Browser Checks What It Already Knows
Before downloading everything again, the browser checks whether it can reuse information it already has.
This is where caching becomes important.
Web browsers can cache resources such as:
- Images
- CSS files
- JavaScript files
- Fonts
- Certain HTTP responses
Caching helps the browser avoid downloading unchanged resources repeatedly.
For example, imagine a website uses the same logo on fifty pages. After downloading it once, the browser may be able to reuse the cached copy instead of requesting the same image again.
This provides two important benefits:
- Faster page loading — some resources can be loaded locally.
- Less network traffic — unnecessary downloads can be avoided.
If the browser cannot use an appropriate cached resource, it continues with the network process and requests what it needs.
Step 3: DNS Helps Find the Website
The next stage is one of the most important.
Humans prefer names such as:
- Domain name: example.com
- DNS: Domain Name System
- DNS purpose: Translates the domain name into information computers can use.
- IPv4 address: An address such as 93.184.216.34
- IPv6 address: A newer type of IP address that can also identify the destination.
How DNS Works During the Request
Before contacting a DNS resolver, the browser and operating system may first check whether useful DNS information is already cached.
The process can be understood like this:
- Check the browser cache — the browser may already have useful DNS information.
- Check the operating system cache — the system may also have a cached DNS result.
- Contact a DNS resolver — if the required information is not available locally, a resolver can be queried.
- Resolve the domain — DNS looks for the records needed to determine where the website can be reached.
- Return the result — the client receives the addressing information needed to continue the connection.
The browser now has something extremely important:
The address of the destination it needs to contact.
This explains why a DNS failure can make a perfectly healthy website appear unavailable. The server may be online, but if the client cannot correctly resolve its name, communication may never reach it.
For a deeper explanation of DNS and name resolution, see What Is DNS and How Does It Work in Active Directory?.
Step 4: The Computer Finds a Path Toward the Server
Knowing an IP address does not mean the destination server is directly connected to your computer.
It may be thousands of kilometers away.
Your computer therefore needs a way to send traffic beyond its own local network.
In many networks, that path begins with the default gateway.
The default gateway is normally a router capable of forwarding traffic toward other networks.
IP and MAC Addresses Have Different Jobs
This part of the journey involves two important types of addresses:
- IP address — provides logical addressing and helps data travel across different networks.
- MAC address — identifies a network interface for local Layer 2 communication, such as on an Ethernet network.
- ARP (IPv4) — helps a device discover the MAC address associated with a local IPv4 address, such as the default gateway.
- Neighbor Discovery (IPv6) — performs similar neighbor-discovery functions for IPv6 instead of using ARP.
When your browser communicates with a remote web server, the IP address helps traffic reach the remote destination, while MAC addressing is used locally as frames move across each local Layer 2 link.
Step 5: The Browser Creates the Connection
Once the destination has been identified, the browser needs to establish communication with the server.
The method depends on the HTTP version being used:
- HTTP/1.1 — commonly uses TCP.
- HTTP/2 — commonly uses TCP.
- HTTP/3 — uses QUIC over UDP.
For many years, TCP (Transmission Control Protocol) has played a central role in web communication. Modern browsers, however, can also use QUIC when communicating through HTTP/3.
The TCP Three-Way Handshake
TCP provides reliable and ordered communication between the browser and server.
Before application data is exchanged, TCP establishes a connection using the three-way handshake:
SYN → SYN-ACK → ACK
- SYN — The client asks the server to start a connection.
- SYN-ACK — The server receives the request and responds.
- ACK — The client confirms the server's response.
The TCP connection is now established, and data can begin flowing between the browser and server.
TCP also provides important features such as:
- Sequencing — keeps data in the correct order.
- Acknowledgments — confirms that data was received.
- Retransmission — resends data when necessary.
- Flow control — helps prevent the receiver from being overwhelmed.
These features make TCP especially useful when reliable data delivery is required.
Step 6: Modern Browsers Can Also Use QUIC
Modern web communication does not always depend on TCP.
HTTP/3 uses QUIC, a modern transport protocol that operates over UDP. QUIC adds features for reliable and secure communication while using UDP underneath.
The main difference is:
- HTTP/1.1 — commonly uses TCP.
- HTTP/2 — commonly uses TCP.
- HTTP/3 — uses QUIC over UDP.
- QUIC — provides reliability, security, and connection management on top of UDP.
QUIC can reduce connection delays and improve performance, especially when network conditions change.
Therefore, the statement “Web browsers always use TCP” is no longer accurate.
Modern browsers can use TCP for HTTP/1.1 and HTTP/2, or QUIC over UDP for HTTP/3.
Step 7: HTTPS Secures the Communication
Finding the server and establishing a connection are not enough. Modern websites also need to protect the information exchanged between the browser and server.
This is why most websites use HTTPS, which protects web communication using TLS (Transport Layer Security).
TLS provides several important protections:
- Confidentiality — encrypts data so others cannot easily read it.
- Integrity — helps ensure data is not altered during transmission.
- Authentication — helps the browser verify the server's identity using a digital certificate.
When a website uses HTTPS, the browser establishes a TLS-protected connection and provides security information about the connection through its address bar or site controls.
The Browser Checks the Certificate
During a secure HTTPS connection, the server normally presents a digital certificate to the browser.
The browser then performs several checks:
- Website identity — verifies that the certificate matches the requested domain.
- Validity — checks that the certificate has not expired and is currently valid.
- Trust — verifies that the certificate chains back to a trusted Certificate Authority (CA).
- Secure keys — cryptographic keys are established to protect communication between the browser and server.
If these checks succeed, secure communication can continue.
If something is wrong, such as an expired certificate, domain mismatch, or untrusted certificate, the browser may display a security warning even though the web server itself is reachable.
Step 8: The Browser Sends an HTTP Request
The browser is finally ready to ask the server for a resource.
It does this through an HTTP request.
For example, when requesting a product page, the request might include:
GET /products
HTTP provides several request methods:
- GET — retrieves a resource.
- POST — submits data to the server.
- PUT — updates or replaces a resource.
- DELETE — requests the removal of a resource.
The method matters because the backend can handle each request differently.
For example, a Laravel application may define a route that accepts POST but not GET. If the browser sends the wrong method, the application can return a 405 Method Not Allowed response.
You can see this problem in more detail in Laravel Method Not Allowed (405) Error — Causes, Fixes, and What It Really Means.
Step 9: The Request Travels Across the Internet
The HTTP request now needs to travel from the client toward the destination.
The internet is not one enormous network controlled by a single organization. Instead, it is a collection of interconnected networks.
The request may travel through several stages:
- Local network — traffic leaves your computer through your home, school, or business network.
- Default gateway — the router forwards traffic outside the local network.
- ISP network — the request enters your Internet Service Provider's network.
- Other networks and routers — routers forward the packets toward the destination.
- Destination network — the traffic eventually reaches the infrastructure hosting the website.
- Web server — the request reaches the system responsible for handling it.
As the request moves through the networking stack, different technologies have different jobs:
- Application data represents the browser's request.
- TCP or QUIC handles transport communication.
- IP helps move packets across networks.
- Ethernet or Wi-Fi carries frames across local network links.
- Physical or wireless media transmit the actual signals.
If you want to understand this journey layer by layer, see How the OSI Model Works: From Browser Request to Web Server.
Step 10: The Web Server Receives the Request
Eventually, the request reaches the destination infrastructure.
Depending on how the website is built, the request may pass through several systems before reaching the application:
- CDN — can deliver cached content from a location closer to the user.
- Firewall — filters traffic based on security rules.
- Load balancer — distributes requests across multiple servers.
- Reverse proxy — receives requests and forwards them to the appropriate service.
- Web server — handles web traffic and serves or forwards the requested content.
Common web server technologies include Nginx and Apache.
For a static website, the web server may return the requested HTML, CSS, image, or other file directly.
A dynamic website works differently. The request often needs to be processed by a backend application before a response can be generated.
This is where frameworks such as Laravel enter the journey.
Step 11: The Request Enters the Backend Application
Imagine the browser requests:
/products/25
The web server may pass this request to a Laravel application.
From the user's perspective, they simply clicked on a product. Behind the scenes, Laravel may perform several steps:
- Match the route — determine which route handles /products/25.
- Process middleware — inspect the request before it reaches the controller.
- Call the controller — execute the appropriate application logic.
- Run business logic — determine what the application needs to do.
- Access the database — retrieve information about product 25 if necessary.
- Build the response — prepare HTML, JSON, or another response for the browser.
The Request Can Pass Through Middleware
Before the request reaches the final controller logic, it may pass through middleware.
Middleware can perform several important tasks:
- Authentication — checks whether the user is logged in.
- Authorization — determines whether the user has permission to access a resource.
- Security — applies protections to incoming requests.
- Sessions — helps maintain information between requests.
- Request processing — can inspect or modify a request before it continues.
Middleware therefore acts as an important bridge between the incoming web request and the application code that handles it.
See Understanding Laravel Middleware — How Requests Travel Through Your Application.
Laravel Determines Which Route Should Handle the Request
Routing connects a URL and HTTP method to the application logic responsible for handling the request.
For example:
/products/25
Laravel may use this path to find a route that sends the request to a controller responsible for product 25.
The process can be understood simply:
- Laravel receives the request.
- The router checks the URL and HTTP method.
- Laravel searches for a matching route.
- The matching route sends the request to the appropriate controller or action.
- If no appropriate route exists, the application may return an error such as 404.
This means the network connection can work perfectly while the Laravel application still fails to handle the request correctly.
See Laravel Routing Errors — Complete Fix Guide.
Step 12: The Application Creates a Response
Once the request reaches the correct controller, the application determines what information it needs.
For a product page, Laravel might need:
- Product name
- Price
- Description
- Images
- Reviews
- Availability
The application may retrieve this information from a database, apply business logic, and then create a response.
Different requests can produce different types of responses:
- HTML — for a normal web page.
- JSON — commonly used by APIs.
- Images or files — when downloading or displaying resources.
- Redirects — send the browser to another URL.
If something goes wrong while processing the request, the application may return a server-side error.
A common example is:
500 Internal Server Error
This usually means the request reached the server, but something failed while the server or application was processing it.
See Laravel 500 Server Error — Why It Happens After Deploy or During Development.
Step 13: The HTTP Response Returns to the Browser
Once the server has processed the request, it sends an HTTP response.
Responses contain status information and headers and can include a response body.
Some familiar status codes are:
200 OK — the request succeeded.
301 Moved Permanently — the resource has moved.
403 Forbidden — the server understood the request but access is not permitted.
404 Not Found — the requested resource could not be found.
500 Internal Server Error — server-side processing failed.
The response then travels back through the network toward the client.
When it arrives, the browser still has a considerable amount of work to do.
Step 14: HTML Becomes a Document
Suppose the server returns HTML.
The browser does not simply display the raw HTML text. Instead, it parses the HTML and builds an internal structure called the Document Object Model (DOM).
The DOM organizes the page into elements and relationships:
- Headings become elements.
- Paragraphs become elements.
- Links become elements.
- Images become elements.
- Forms become elements.
- Navigation menus and containers become part of the document structure.
This structured representation allows the browser and JavaScript to work with individual parts of the page instead of treating the HTML as one long block of text.
Step 15: CSS Determines How the Page Looks
HTML provides the structure of the page, while CSS controls its presentation.
CSS can control:
- Typography — fonts, sizes, and text appearance.
- Colors — text and background colors.
- Spacing — margins and padding.
- Dimensions — width and height.
- Positioning — where elements appear.
- Layouts — including Flexbox and Grid.
- Responsive design — how the page adapts to different screen sizes.
- Borders and other visual effects.
The browser processes the CSS rules and determines which styles apply to each element.
This explains why a website can technically load but still look broken. For example, the HTML may arrive successfully while an important stylesheet fails to load. The content is still there, but it may appear without its intended design.
Step 16: JavaScript Makes the Page Interactive
Modern websites are rarely completely static.
JavaScript allows the browser to make pages interactive and dynamic after the initial HTML has loaded.
JavaScript can:
- Modify page elements — change text, styles, images, or other content.
- Respond to user actions — react to clicks, typing, scrolling, and other events.
- Validate forms — check user input before data is submitted.
- Send additional requests — communicate with servers without requiring a full page reload.
- Load API data — retrieve information from backend services.
- Update content dynamically — change parts of the page without reloading everything.
- Power complex web applications — support interactive dashboards, online tools, and other application-like experiences.
This means that seeing the initial page does not necessarily mean the browser has finished all of its work.
JavaScript may continue running, requesting data, and updating the page after the first content becomes visible.
Step 17: One Page Can Trigger Many More Requests
Opening one URL rarely results in only one network request.
After receiving the HTML, the browser may discover references to additional resources such as:
- CSS files
- JavaScript files
- Images
- Fonts
- Videos
- Analytics resources
- API requests
The browser then requests the resources it needs to complete the page.
As a result, a single page load can generate dozens or even hundreds of network requests.
Modern browsers make this process more efficient using techniques such as:
- Caching — reuses previously downloaded resources when possible.
- Prioritization — gives more important resources higher priority.
- Connection reuse — reuses existing connections instead of creating a new one for every resource.
- Parallel or multiplexed loading — allows multiple resources to make progress efficiently, depending on the HTTP version and connection.
You can observe this process yourself by opening your browser's Developer Tools and selecting the Network panel.
What appears to the user as a single web page is actually the result of many individual resources and requests working together.
Step 18: The Browser Finally Renders the Page
Once enough information is available, the browser can begin rendering the page.
To display the page correctly, the browser needs to determine:
- Which elements exist — based mainly on the HTML and DOM.
- Which styles apply — using the CSS rules.
- How large elements should be — calculating their dimensions.
- Where elements should appear — determining the page layout.
- What needs to be painted — drawing text, backgrounds, borders, images, and other visual content.
- What may change dynamically — JavaScript can modify the page even after it becomes visible.
Different technologies contribute to the final result:
- HTML — provides the structure.
- CSS — provides the presentation.
- JavaScript — provides behavior and interactivity.
- Images, fonts, and other resources — complete the visual experience.
The browser combines all of this information and produces the page visible on the screen.
The simple action that began with:
Type URL → Press Enter
has finally become:
A complete interactive web page.
What Happens When the Process Fails?
Understanding how a browser works becomes especially valuable when something goes wrong.
A page that refuses to load can have many different causes:
- DNS failure — the browser cannot resolve the domain name.
- Local network problem — the device may not be able to reach the network or default gateway.
- Routing problem — packets may not successfully reach the destination network.
- Firewall problem — communication may be blocked.
- HTTPS problem — certificate or TLS verification may fail.
- Web server problem — the server may be unavailable or incorrectly configured.
- 404 Not Found — the requested resource or application route may not exist.
- 500 Internal Server Error — something failed during server-side processing.
- JavaScript error — the HTML may load successfully while part of the page fails afterward.
This is why troubleshooting becomes easier when you understand the complete request journey.
The browser, DNS, network, web server, and backend application are different systems, but they all participate in delivering the final web page to the user.
Why a Website Can Work Locally but Fail Online
This journey also explains one of the most confusing situations developers encounter:
The application works perfectly on localhost, but fails after deployment.
The code may be nearly identical, but the environment is different.
A production environment introduces additional components and configurations:
- DNS — the domain must point to the correct server.
- HTTPS certificates — TLS must be configured correctly.
- Server permissions — the application needs the correct access to files and directories.
- Web server configuration — Apache or Nginx must route requests correctly.
- Environment variables — production settings may differ from local development.
- Caching — old configuration, routes, or application data may remain cached.
- Routing — requests must reach the correct application routes.
- Domains and URLs — production uses real domain names and public URLs.
- Network infrastructure — firewalls, proxies, load balancers, or hosting configurations can affect requests.
The browser also communicates with the production application through a real network instead of directly with a local development environment.
These differences can expose problems that were invisible during development.
See Laravel Works Locally but Not on Server — The Hidden Differences You Must Understand.
Why Understanding the Browser Makes You a Better Developer
A developer does not need to understand every internal detail of Chrome, Firefox, or another browser.
However, understanding the journey from browser to server and back again makes troubleshooting much easier.
When a website is slow, you can ask more specific questions:
- Is DNS resolution slow?
- Is connection establishment taking too long?
- Is the server slow to respond?
- Is backend processing taking too long?
- Are images or other resources too large?
- Is JavaScript delaying rendering or interaction?
- Are unnecessary resources being downloaded?
- Is the server returning an error?
When a request completely fails, you can also investigate where the problem occurs:
Browser → DNS → Network → Web Server → Backend Application → Response
This is far more useful than treating every website failure as simply a coding problem.
The browser sits at the point where several technologies meet:
- Networking
- DNS
- HTTP and HTTPS
- Security
- Frontend development
- Backend development
- Server infrastructure
Understanding how a browser works therefore gives you a better understanding of how all these systems cooperate to transform a simple URL into a working web page.
Conclusion
Typing a URL and pressing Enter looks like a simple action, but behind it is a complete journey involving the browser, DNS, networks, security, web servers, and application code.
The browser must find the destination, establish communication, send the request, receive the response, and transform the returned resources into the page you see on the screen.
For developers, understanding how a browser works is useful far beyond theory. It helps explain why websites become slow, why requests fail, why applications behave differently after deployment, and where to begin when troubleshooting a problem.
The next time you open a website, remember that the page did not simply appear. Many technologies worked together in just a short amount of time to make that request possible.
From URL to DNS, from network to server, and from HTTP response to rendered page, every step is part of the same journey.
And understanding that journey gives you a much clearer picture of how the web actually works.
Related Articles
- How the OSI Model Works: From Browser Request to Web Server
- What Is DNS and How Does It Work in Active Directory?
- Laravel Works Locally but Not on Server — The Hidden Differences You Must Understand
- Laravel Deployment Errors — Complete Fix Guide
- Why Sessions Break in Laravel — Understanding What Actually Happens Behind the Scenes



































Discussion 0