What Is Laravel Authentication? Complete Beginner Guide (2026)
Table of Contents
- What Is Laravel Authentication?
- Why Authentication Matters
- Authentication vs Authorization
- How Laravel Authentication Works
- Laravel Authentication Flow
- Installing Laravel Authentication
- Creating Login and Registration
- Protecting Routes
- Guards
- Middleware
- Sessions
- Common Authentication Errors
- Best Practices
- FAQ
What Is Laravel Authentication?
Every modern web application needs a way to identify users.
Imagine opening your favorite social media platform. Before you can post, comment, or view your private profile, the website first needs to answer one simple question:
Who are you?
This process is called Laravel Authentication.
Authentication is the mechanism that verifies a user's identity before granting access to protected areas of an application. Without authentication, every visitor would have unrestricted access to every account, making applications insecure and unusable.
In Laravel, authentication is not just a login form. It is an entire security system responsible for identifying users, maintaining sessions, protecting routes, and ensuring that only authorized users can access sensitive information.
If you're new to Laravel, authentication may seem like a collection of unrelated concepts:
- Login
- Registration
- Sessions
- Cookies
- Middleware
- Guards
- Password Hashing
At first glance, these topics appear disconnected.
The reality is very different.
Laravel combines all of these components into a single authentication system that works together behind the scenes.
Understanding this system will make many confusing Laravel errors suddenly make sense.
For example, if you've ever experienced:
- Login redirect loops
- 419 Page Expired
- Session Expired
- User immediately logged out
These problems are often related to authentication.
If you've already encountered these issues, you may also want to read our guide on Laravel Session & Authentication Errors and Laravel Login Not Working, where we explain how authentication failures affect sessions and login persistence.
Why Authentication Is Important
Without authentication, every visitor would have access to:
- User accounts
- Personal information
- Orders
- Payments
- Private dashboards
- Administrative panels
Imagine an online banking application without authentication.
Anyone could simply visit:
- /bank/account
- and immediately see another person's balance.
- Clearly, this would be catastrophic.
- Authentication prevents exactly this scenario.
It ensures that every request answers an important question before Laravel processes it:
Is this user really who they claim to be?
If the answer is yes, Laravel allows the request to continue.
If not, access is denied.
Authentication vs Authorization
Many beginners confuse these two concepts.
Although they work together, they solve different problems.
Authentication answers:
Who are you?
Authorization answers:
What are you allowed to do?
Example:
Sarah logs into your Laravel application.
Authentication verifies:
✔ Sarah entered the correct email.
✔ Sarah entered the correct password.
After login succeeds:
Authorization determines:
- Can Sarah edit posts?
- Can Sarah delete users?
- Can Sarah access the admin dashboard?
Authentication happens first.
Authorization happens afterward.
Laravel separates these responsibilities to keep applications secure and organized.
Real-Life Example
Imagine entering an airport.
At the entrance:
- Security checks your passport.
- This is authentication.
- Once inside:
- Your boarding pass determines which gate you may enter.
- This is authorization.
- Laravel works exactly the same way.
How Laravel Authentication Works
Many beginners think authentication works like this:
User
↓
Login
↓
Dashboard
In reality, Laravel performs many hidden steps.
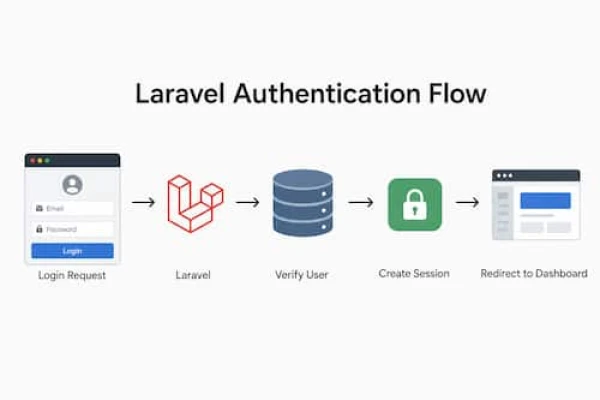
When a user submits a login form, Laravel typically:
- Receives the request.
- Validates the submitted data.
- Searches for the user in the database.
- Verifies the hashed password.
- Creates a secure session.
- Stores the authenticated user ID.
- Sends a session cookie to the browser.
- Redirects the user to the intended page.
This entire process usually happens within milliseconds.
Because Laravel handles these steps automatically, developers often underestimate how much work happens behind the scenes.
Understanding this flow makes debugging much easier.
For example, if login suddenly stops working, the problem may not be the password at all. It could be related to sessions, cookies, middleware, or environment configuration. We explore these scenarios in our articles Laravel Session Not Working? Fix 419, CSRF & Login Issues and Understanding Laravel Environment Configuration — How Laravel Thinks Behind the Scenes.
Laravel Authentication Flow
A typical authentication request follows this sequence:
Browser
│
▼
Login Form
│
▼
Validate Request
│
▼
Find User
│
▼
Verify Password
│
▼
Create Session
│
▼
Generate Cookie
│
▼
Redirect User
Each step depends on the previous one.
If validation fails, Laravel never checks the password.
If the password is incorrect, Laravel never creates a session.
If the session cannot be stored correctly, the user may appear to log in successfully but will immediately be logged out after the next request.
This is one of the most common reasons developers experience persistent login problems.
Installing Laravel Authentication
Years ago, implementing authentication meant writing hundreds of lines of code manually.
Developers had to:
- Build login forms.
- Hash passwords correctly.
- Manage sessions.
- Protect routes.
- Prevent CSRF attacks.
- Handle password resets.
- Implement "Remember Me" functionality.
Laravel dramatically simplifies this process by providing official starter kits.
The most beginner-friendly option is Laravel Breeze.
Breeze provides:
- User registration
- Login
- Logout
- Password hashing
- Session management
- Email verification (optional)
- Password reset functionality
Instead of reinventing authentication from scratch, you can focus on building your application.
Installing Laravel Breeze
Start with a fresh Laravel project.
composer create-project laravel/laravel blogMove into the project directory.
cd blogInstall Breeze.
composer require laravel/breeze --devRun the Breeze installer.
php artisan breeze:installLaravel will ask which stack you want.
For beginners, choose:
- Blade
Then install JavaScript dependencies.
npm installCompile assets.
npm run buildFinally, migrate the database.
php artisan migrateStart the development server.
php artisan serveYou now have a complete authentication system.
What Did Laravel Create?
Many beginners install Breeze without understanding what it generated.
Laravel automatically creates:
- app/
resources/views/auth/
routes/auth.php
AuthenticatedSessionController
RegisteredUserController
PasswordResetController
EmailVerificationController
It also creates:
- Login page
- Register page
- Forgot Password page
- Reset Password page
- Email Verification page
This saves hours of development time.
Understanding the Login Request
When a user clicks Login, the browser sends something similar to:
- POST /login
With data like:
- email = john@example.com
password = secret123
Laravel then performs several checks.
Step 1
Validate the request.
$request->validate([ 'email' => ['required','email'],
'password' => ['required'], ]);
If validation fails...
Laravel immediately redirects back.
No database query happens.
Step 2
Search for the user.
Laravel looks inside the users table.
Example:
| id | name | |
|---|---|---|
| 1 | John | john@example.com |
If the email doesn't exist...
Authentication stops.
Step 3
Verify the password
Laravel does not compare plain passwords.
Instead it compares hashes.
Hash::check($password,$user->password);Because passwords should never be stored like this:
❌
- secret123
Instead Laravel stores something like:
- $2y$12$hS93fK…
This protects users if the database is compromised.
Why Password Hashing Matters
Imagine your database leaks.
If passwords are stored as plain text:
123456
password
admin
secret123
Attackers instantly know everyone's password.
Laravel avoids this by using secure hashing.
Creating a password:
use Illuminate\Support\Facades\Hash;
$user = User::create([
'name'=>'John',
'email'=>'john@example.com',
'password'=>Hash::make('secret123'), ]);
Notice:
Laravel never stores:
- secret123
Instead it stores a secure hash.
Logging Users In Manually
Sometimes you want to authenticate users yourself.
Laravel provides:
use Illuminate\Support\Facades\Auth;Login:
if(Auth::attempt([
'email'=>$request->email,
'password'=>$request->password ])){ $request->session()->regenerate();
return redirect()->intended('/dashboard'); }
Otherwise:
return back()->withErrors([
'email'=>'Invalid credentials.' ]);
This small block performs an enormous amount of work:
- Finds the user.
- Checks the password.
- Creates the session.
- Regenerates the session ID.
- Protects against Session Fixation attacks.
- Redirects the user.
Why regenerate() Is Important
Many developers copy this line without understanding it.
$request->session()->regenerate();This creates a new session ID immediately after login.
Why?
Without regeneration...
A malicious user could force another person to use a known session ID.
Laravel prevents this attack automatically.
Protecting Routes
Authentication isn't useful unless protected pages exist.
Imagine this route:
Route::get('/dashboard',function(){ return view('dashboard'); });
Anyone could visit it.
Even guests.
Instead use the auth middleware.
Route::middleware('auth')->group(function(){
Route::get('/dashboard',function(){
return view('dashboard');
});
});
Now Laravel checks authentication before executing the route.
If the visitor isn't logged in...
Laravel redirects them to:
- /login
This demonstrates how middleware works together with authentication. If you're unfamiliar with middleware, read Understanding Laravel Middleware — How Requests Travel Through Your Application, where we explain how requests pass through the middleware pipeline before reaching your controllers.
Checking Authentication
Sometimes you simply want to know:
Is someone logged in?
if(Auth::check()){ echo "Authenticated"; }Otherwise:
- echo "Guest";
Retrieve the current user:
$user = Auth::user();}Current user's ID:
$id = Auth::id();These helper methods are used throughout Laravel applications.
Logging Out
Logout is equally simple.
use Illuminate\Support\Facades\Auth;
Auth::logout();
$request->session()->invalidate();
$request->session()->regenerateToken();
return redirect('/');
Notice that Laravel also:
- Invalidates the session.
- Regenerates the CSRF token.
This improves security after logout.
Understanding Laravel Guards
One of the most misunderstood parts of Laravel Authentication is the concept of guards.
Many beginners hear the word guard and immediately think it refers to user roles such as Admin or User.
It doesn't.
A guard defines how Laravel authenticates a user for each request.
Think of it as the authentication driver.
For example, your application may support:
- Website users
- API clients
- Mobile applications
- Administrators
Each one can authenticate differently.
Laravel allows you to separate these authentication methods using guards.
Default Guard
Open:
- config/auth.php
You'll find something similar to:
- 'defaults' => [
'guard' => 'web',
'passwords' => 'users',
],
The default guard is:
- web
This means Laravel authenticates website visitors using sessions and cookies.
Available Guards
By default you'll see something like:
'guards' => [
'web' => [
'driver' => 'session',
'provider' => 'users',
],
];
The session driver stores authentication inside the user's session.
For APIs you might instead use:
- Sanctum
- Passport
These use tokens instead of browser sessions.
What Is a Provider?
A guard decides how Laravel authenticates.
A provider decides where users come from.
Example:
'providers' => [
'users' => [
'driver' => 'eloquent',
'model' => App\Models\User::class,
],
];
Laravel knows users exist inside:
- users table
through the User model.
If you had another table:
- admins
you could create another provider.
Protecting Routes with Middleware
Middleware is one of Laravel's most powerful features.
Instead of checking authentication inside every controller...
Laravel checks authentication before the controller executes.
Example:
Route::middleware('auth')->group(function(){
Route::get('/dashboard',function(){
return view('dashboard'); });
Route::get('/profile',function(){
return view('profile'); }); });
Now every route inside this group requires login.
No duplicated code.
No repeated Auth::check().
If you'd like to understand how middleware processes every incoming request, read our article Understanding Laravel Middleware — How Requests Travel Through Your Application, where we explain the request lifecycle in detail.
Protecting Individual Routes
Instead of grouping routes...
You can protect one route.
Route::get('/dashboard',function(){
return view('dashboard'); })->middleware('auth');
Simple.
Clean.
Readable.
Redirecting Guests
Suppose an anonymous visitor opens:
- /dashboard
Laravel automatically redirects them to:
- /login
This behavior comes from:
- Authenticate Middleware
- No additional code is required.
Retrieving the Authenticated User
Laravel provides several helper methods.
Current user:
- $user = Auth::user();
Current user ID:
- $id = Auth::id();
Current user name:
- echo Auth::user()->name;
Current email:
- echo Auth::user()->email;
These helpers are available almost everywhere in Laravel.
Authentication Inside Controllers
Example:
use Illuminate\Support\Facades\Auth;
class DashboardController extends Controller {
public function index() {
$user = Auth::user();
return view('dashboard',compact('user'));
} }
Now the view receives the authenticated user.
Blade:
Welcome {{ $user->name }}
Very simple.
Remember Me
Many login forms contain this checkbox.
☑ Remember Me
Laravel supports it automatically.
Example:
Auth::attempt( [
'email'=>$request->email,
'password'=>$request->password ],
$request->remember );
If checked...
Laravel creates a long-lived cookie.
The user remains logged in after closing the browser.
Email Verification
Some applications require users to verify their email address.
Laravel includes this feature.
Example:
Route::middleware(['auth','verified']) ->group(function(){
Route::get('/dashboard',function(){
return view('dashboard');
});
});
Now users must:
- Register
- Verify email
- Access dashboard
Very secure.
Password Reset
Laravel Breeze also includes password reset.
User clicks:
- Forgot Password?
Laravel:
- Sends reset email
- Creates temporary token
- Verifies token
- Allows new password
You don't need to build this manually.
Common Authentication Errors
Even experienced Laravel developers encounter authentication problems.
Let's solve the most common ones.
1. Login Refreshes Without Logging In
Possible causes:
- Session driver incorrect
- Cookies blocked
- APP_URL incorrect
- Session expired
Check:
SESSION_DRIVER=fileAlso verify:
APP_URL=http://127.0.0.1:8000For a complete troubleshooting guide, see Laravel Login Not Working? Fix Session, CSRF & Redirect Issues.
2. 419 Page Expired
Usually caused by:
- Missing CSRF token
- Expired session
- Invalid cookie
Correct form:
You can also read our dedicated guide Laravel 419 Page Expired Error: 9 Proven Fixes, which explains every possible cause in depth.
3. User Gets Logged Out Immediately
Possible reasons:
- Session storage not writable
- Cookies disabled
- Session lifetime too short
Check:
- SESSION_LIFETIME=120
4. Invalid Credentials
Never compare passwords manually.
Incorrect:
if($request->password==$user->password)Correct:
Hash::check( $request->password, $user->password );Or simply use:
- Auth::attempt(...)
Laravel handles everything.
5. Middleware Doesn't Work
Make sure the route is protected.
Correct:
Route::middleware('auth')->group(function(){ });Also verify:
- User logged in
- Session working
- Guard configured correctly
If middleware still behaves unexpectedly, our article Laravel Middleware Not Working? 7 Common Fixes covers the most frequent configuration mistakes.
Best Practices
Follow these recommendations when implementing Laravel Authentication:
- Always hash passwords using Hash::make().
- Never store plain-text passwords.
- Use Auth::attempt() instead of custom authentication logic.
- Regenerate the session after login.
- Protect sensitive routes with the auth middleware.
- Enable email verification for applications that require verified accounts.
- Keep your session configuration secure.
- Use HTTPS in production so cookies are encrypted during transmission.
- Regularly update Laravel to receive the latest security improvements.
By following these practices, you'll build authentication systems that are secure, maintainable, and aligned with Laravel's official recommendations.
Frequently Asked Questions
Is Laravel Authentication built into Laravel?
Yes. Laravel provides a built-in authentication system through official starter kits like Laravel Breeze and Jetstream. These packages include login, registration, password reset, email verification, and secure session management, allowing you to implement authentication quickly without building everything from scratch.
Should I use Laravel Breeze, Jetstream, Sanctum, or Passport?
It depends on your project:
- Laravel Breeze – Best for beginners and traditional web applications.
- Laravel Jetstream – Ideal for applications that need advanced features like two-factor authentication and profile management.
- Laravel Sanctum – Recommended for SPAs and mobile applications using API tokens.
- Laravel Passport – Best when implementing a full OAuth2 authentication server.
Where does Laravel store authenticated users?
Laravel stores user information in the users table by default. After a successful login, it saves the authenticated user's ID inside the session, allowing Laravel to identify the user on future requests without asking them to log in again.
Why is Auth::attempt() better than checking passwords manually?
Auth::attempt() automatically verifies the hashed password, creates a secure session, regenerates the session ID, and logs the user in. Writing your own authentication logic increases the risk of security mistakes.
Why do I keep getting redirected back to the login page?
This usually happens because Laravel cannot maintain the user's session. Common causes include:
- Incorrect session configuration.
- Missing cookies.
- Wrong APP_URL.
- Expired sessions.
- The auth middleware protecting the route while the user isn't actually authenticated.
If you're facing this problem, you may also want to read Laravel Login Not Working? Fix Session, CSRF & Redirect Issues.
Why does Laravel return a 419 Page Expired error after login?
A 419 error usually indicates that Laravel rejected the request because the CSRF token is missing, invalid, or the user's session has expired. Ensuring every POST form includes @csrf and checking your session configuration often resolves the issue.
Can I create separate authentication systems for admins and users?
Yes. Laravel supports multiple authentication guards, allowing you to create completely separate login systems for administrators, customers, vendors, employees, or API users without mixing their authentication logic.
Is Laravel Authentication secure enough for production?
Yes. Laravel follows modern security best practices, including password hashing with Bcrypt or Argon2, CSRF protection, secure sessions, middleware, email verification, and session regeneration. When combined with HTTPS and proper server configuration, it provides a strong authentication system for production applications.
Can I replace Laravel Breeze later?
Absolutely. Many developers start with Breeze and later migrate to Jetstream, Sanctum, or Passport as their application's requirements grow. Since all official authentication packages follow Laravel's authentication architecture, upgrading is usually straightforward.
What should I learn after Laravel Authentication?
Once you're comfortable with authentication, the next topics to learn are:
- Laravel Authorization (Gates & Policies)
- Middleware
- Eloquent Relationships
- Form Requests
- API Authentication with Sanctum
- Roles & Permissions
- Events and Notifications
Mastering these topics will help you build secure and scalable Laravel applications.
Conclusion
Laravel Authentication is much more than a simple login system. It is the foundation of application security, ensuring that users can securely register, log in, and access only the resources they're permitted to use. By understanding how authentication works behind the scenes—including sessions, guards, providers, middleware, password hashing, and route protection—you'll be able to build secure, scalable, and maintainable Laravel applications with confidence.
Whether you're creating a personal blog, an eCommerce platform, a SaaS product, or a large enterprise application, mastering Laravel Authentication is an essential step in becoming a better Laravel developer.
As you continue learning, remember that authentication is only the beginning. Once you've mastered it, you should explore authorization with Gates and Policies, API authentication using Laravel Sanctum or Passport, and advanced security practices to further strengthen your applications.
If you encounter authentication-related issues such as login redirect loops, session expiration, middleware problems, or 419 Page Expired errors, make sure to check our related Laravel guides for detailed troubleshooting and practical solutions.
Continue learning Laravel with these in-depth guides:
- Laravel Login Not Working? Fix Session, CSRF & Redirect Issues
- Laravel Session Not Working? Fix 419, CSRF & Login Issues
- Understanding Laravel Middleware
- Laravel 419 Page Expired Error: 9 Proven Fixes
- Understanding Laravel Environment Configuration
- How to Refactor and Improve a Laravel Project Without Breaking Everything

































Discussion 0